
AWS GPU Instanz mit OpenCV und Tensorflow einrichten
DISCLAIMER: Wir verwenden AWS Resourcen, die nicht mehr in den “Free-Tier” fallen - d.h. es entstehen Kosten und man sollte immer darauf achten, dass man unbenötigte Instanzen auch wieder stoppt!
Wer in seinem Notebook keine aktuelle Nvidia Grafikkarte hat, der kann sich eine AWS GPU Instanz bauen und diese als Entwicklungsumgebung verwenden.
Überblick
- Setze AWS GPU Instanz mit Ubuntu 16.04 auf
- Server updaten und rebooten
- Installiere CUDA und cuDNN (von NVIDIA)
- Installiere OpenCV 3.3 mit Python 3.5
- Installiere Tensorflow
- Installiere Jupyter Notebook
- (Installiere Caffe)
GPU Instanz einrichten
Als erstes logged man sich in der AWS Console ein und geht in den Bereich “EC2”.
Als erstes sollte man ein Keypair erstellen.
Danach wählt man “Launch Instance”, um eine neue Instanz zu starten.
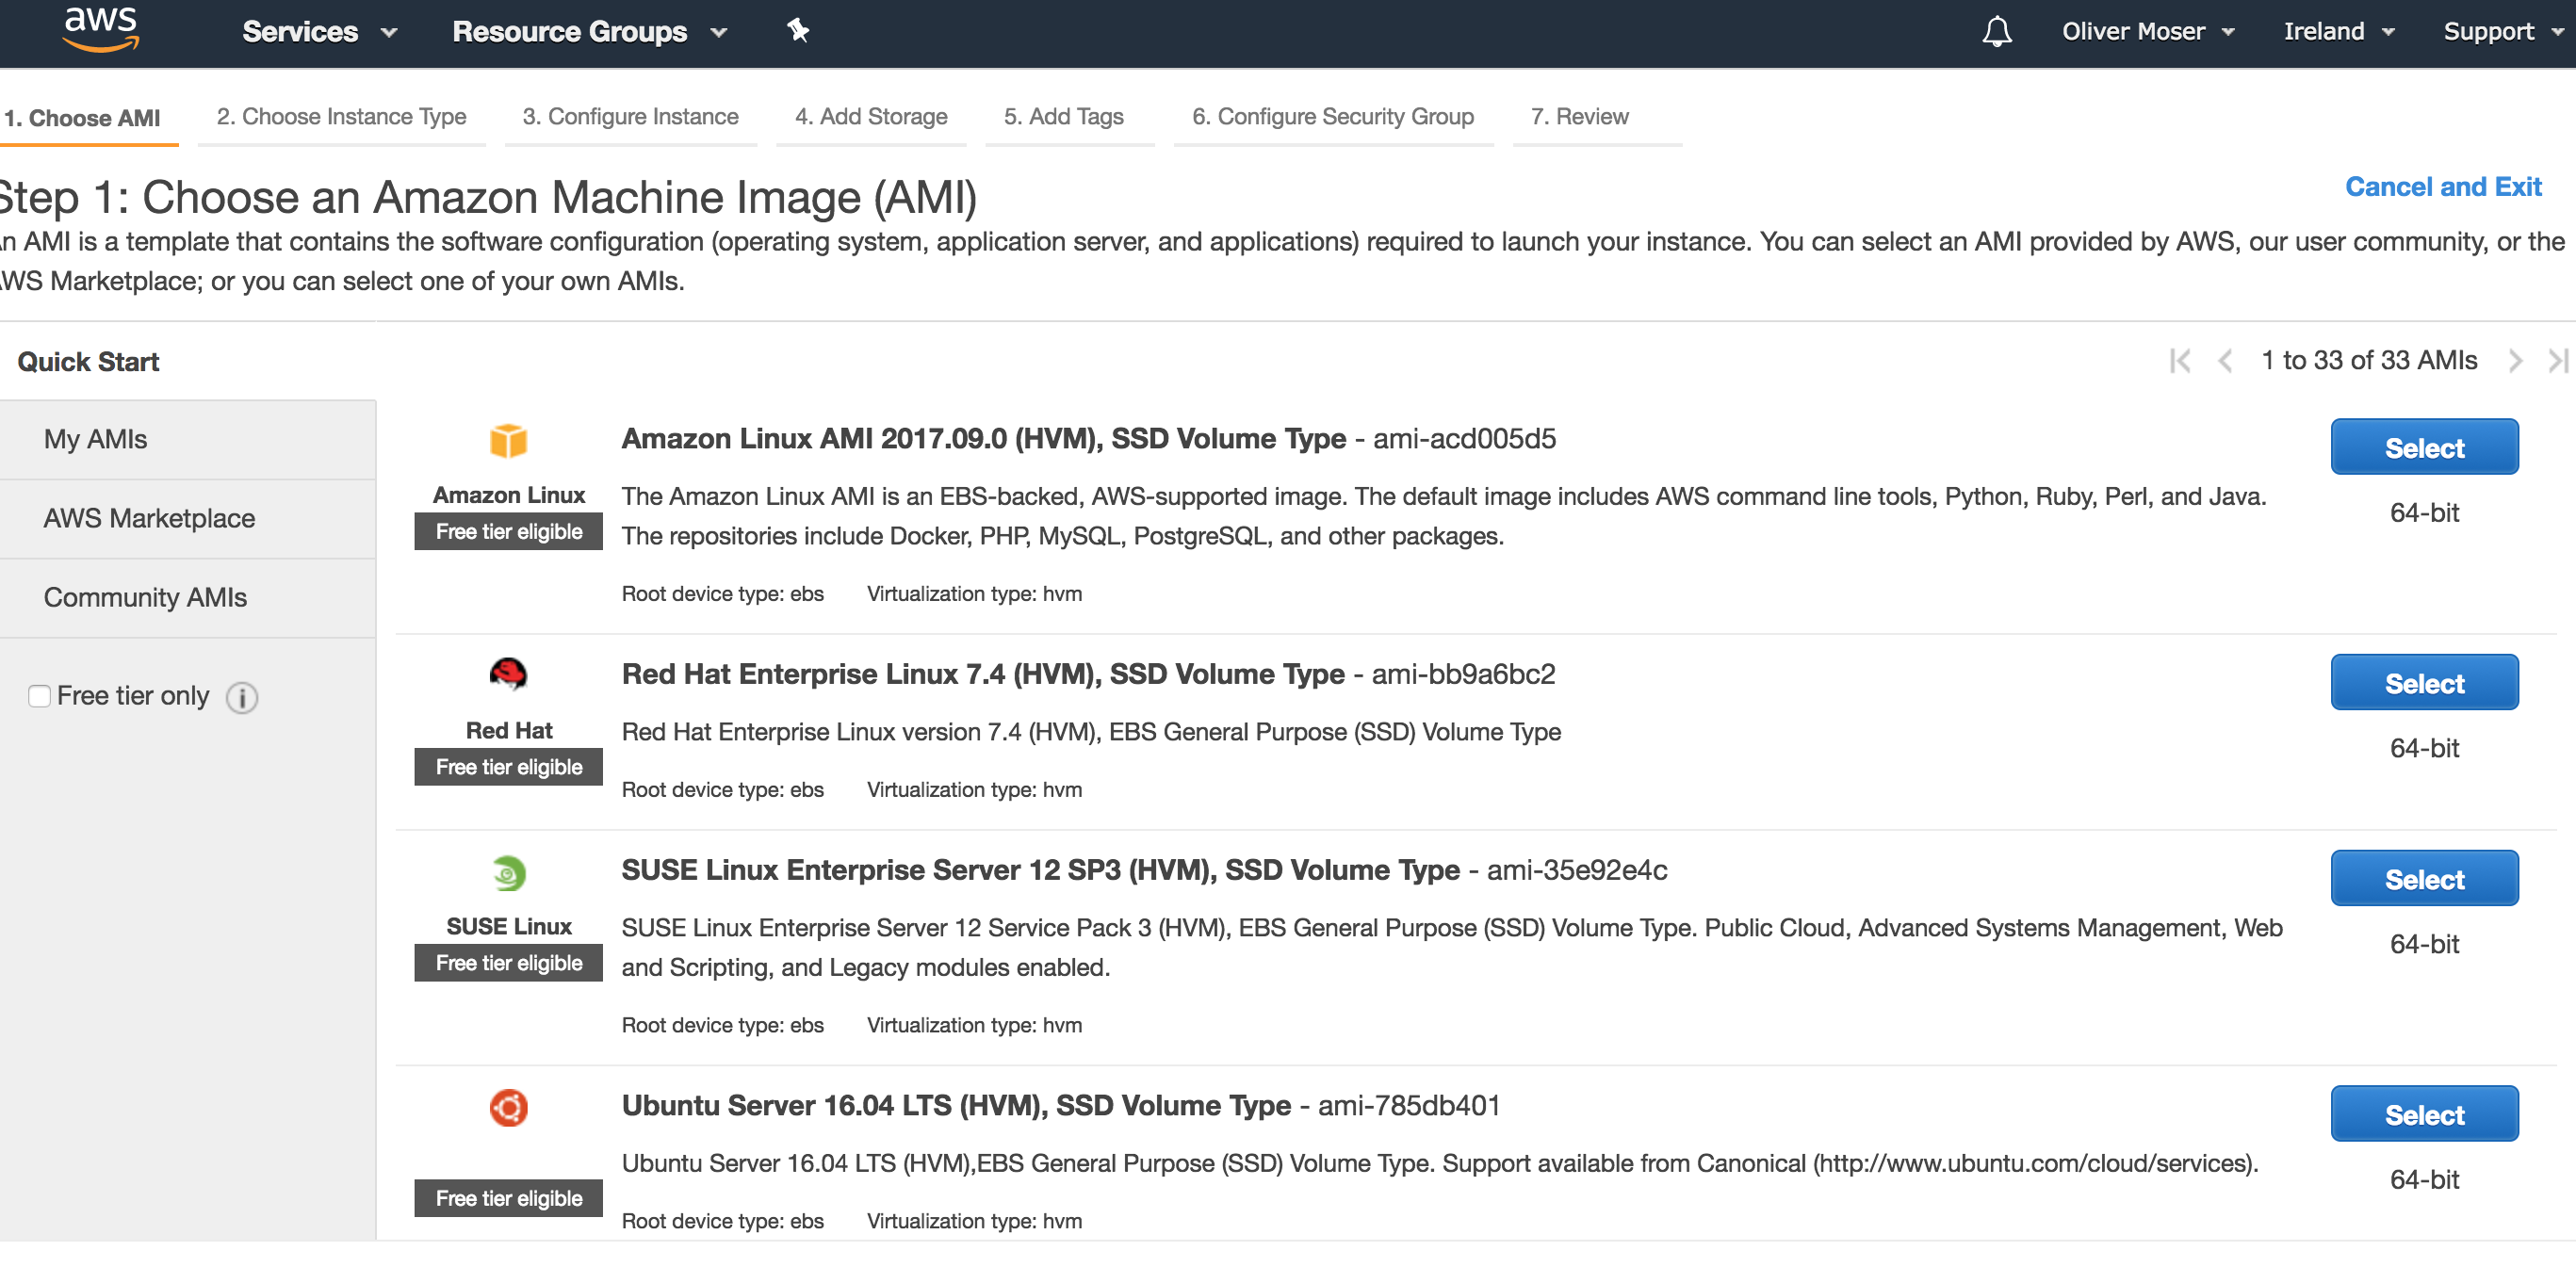
Als Betriebssystem wählen wir “Ubuntu 16.04 LTS” - die meisten Tools im Bereich Computer Vision sind unter Ubuntu am einfachsten zum Laufen zu bringen.
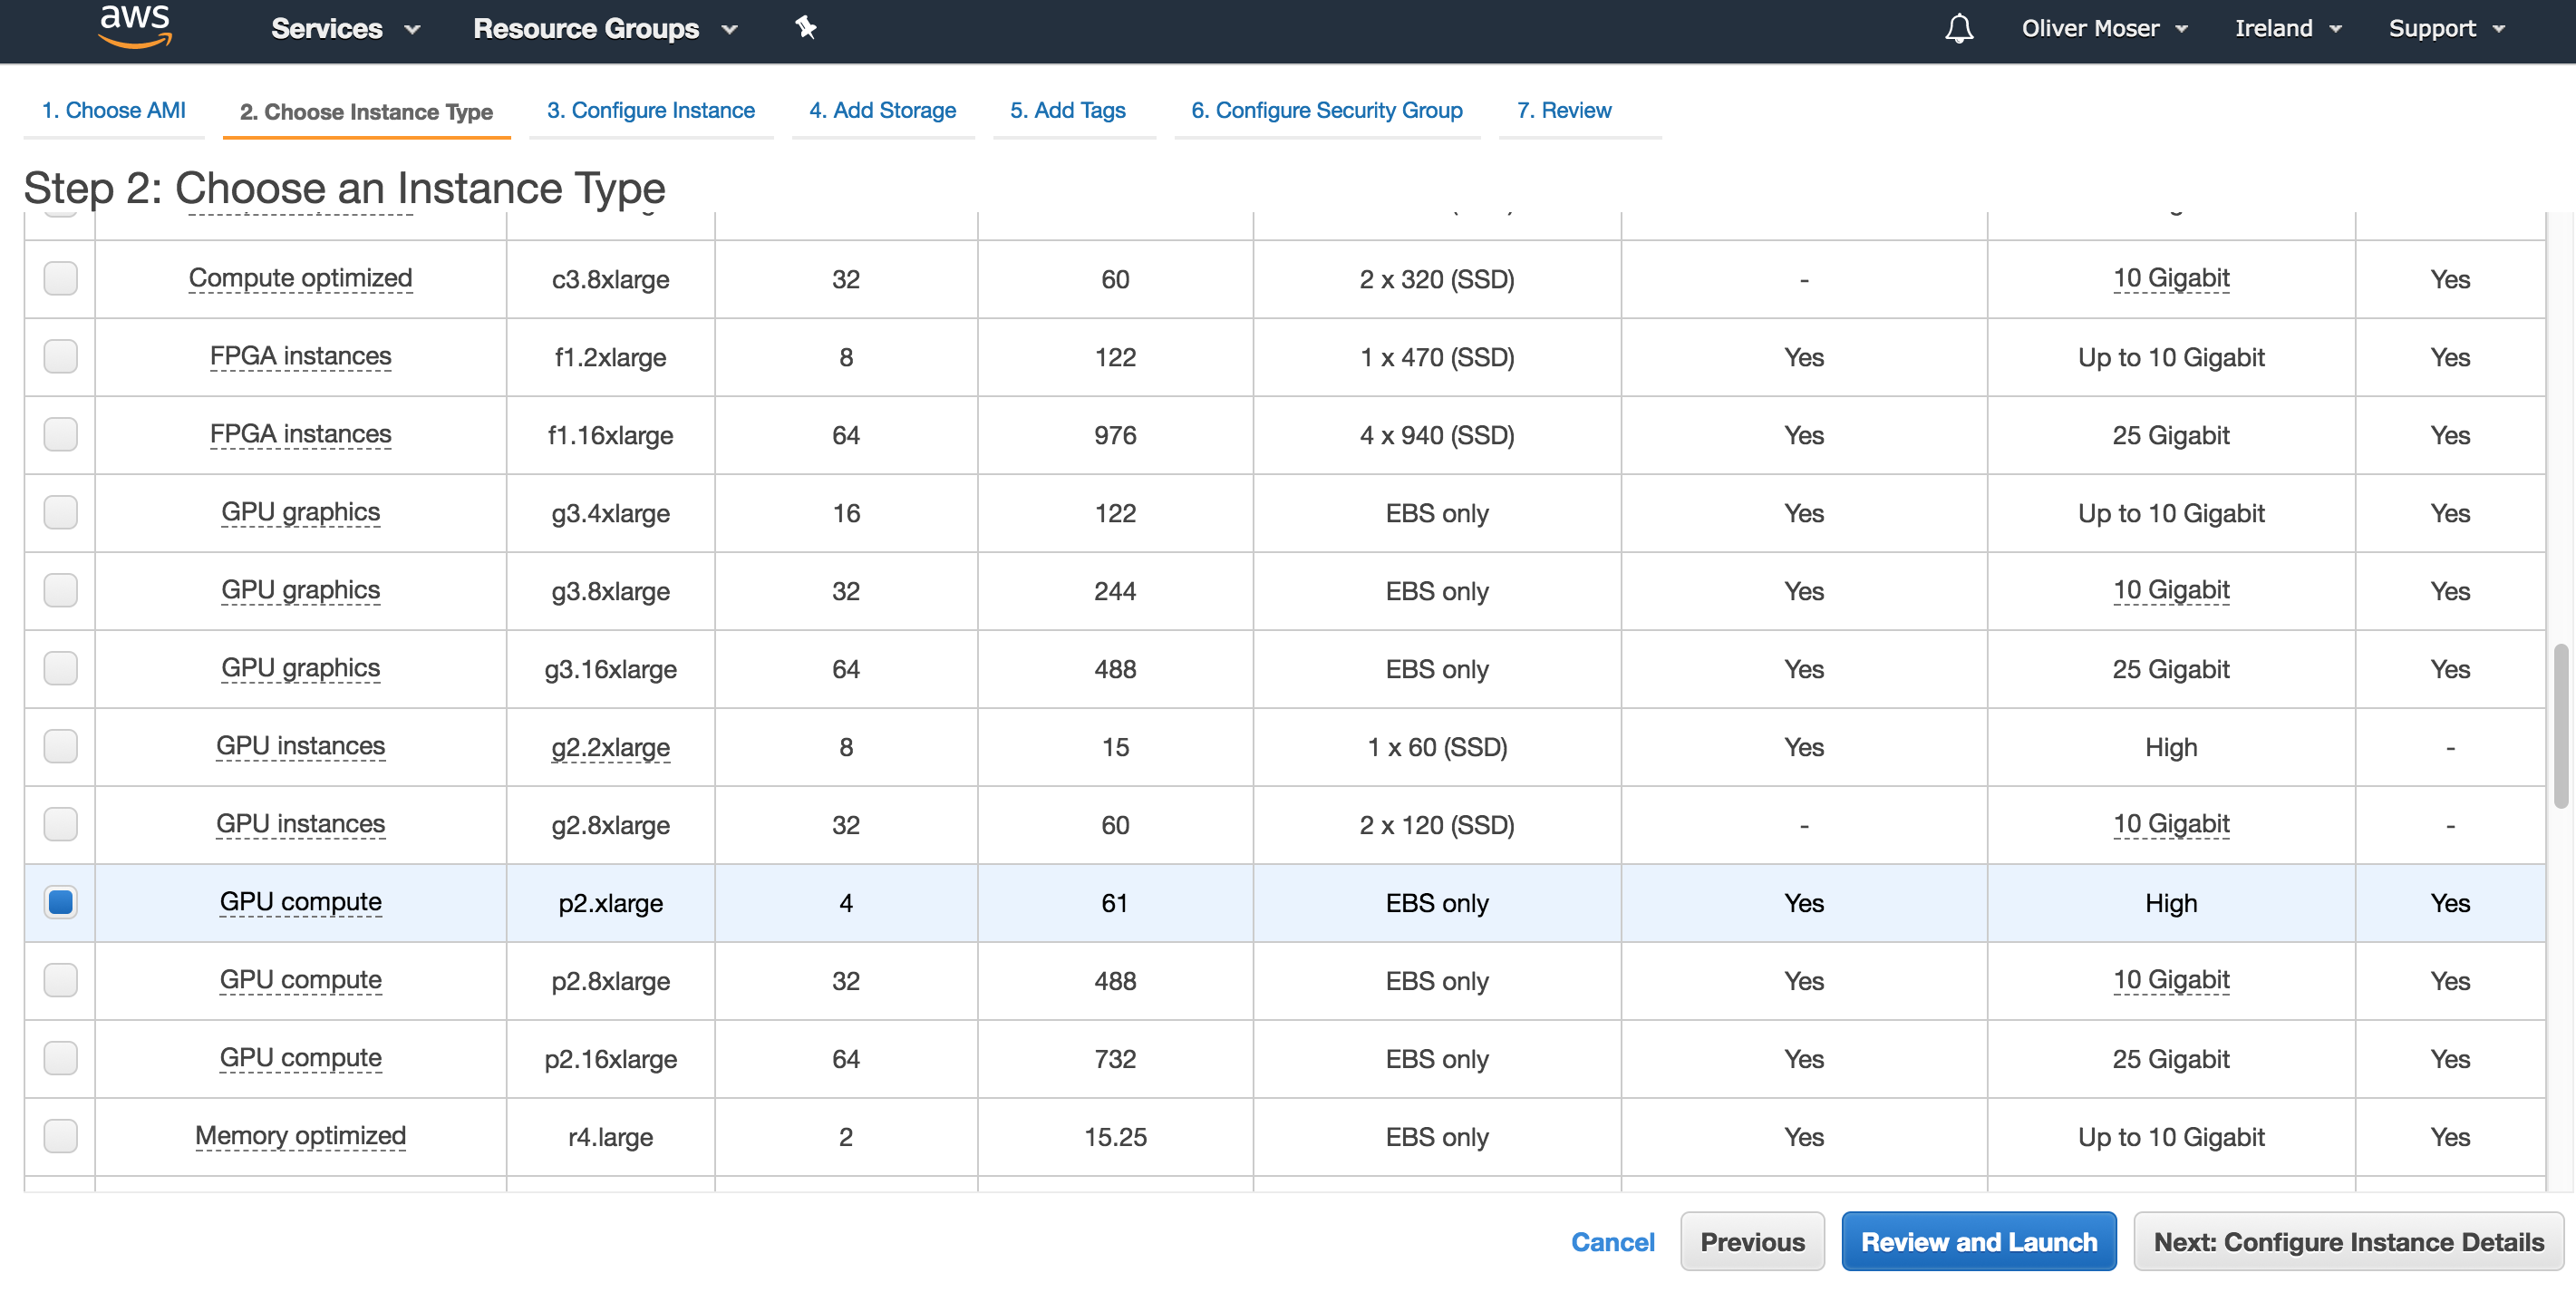
Danach wählt man einen Instanz Typ aus. Wir verwenden eine “p2.xlarge” Instanz. Die hat genügend RAM / CPU und GPU Leistung für unsere Entwicklungs-Umgebung. Alternativ kann man auch stärkere/schwächere Instanzen wählen - das ist hauptsächlich eine Kostenfrage.
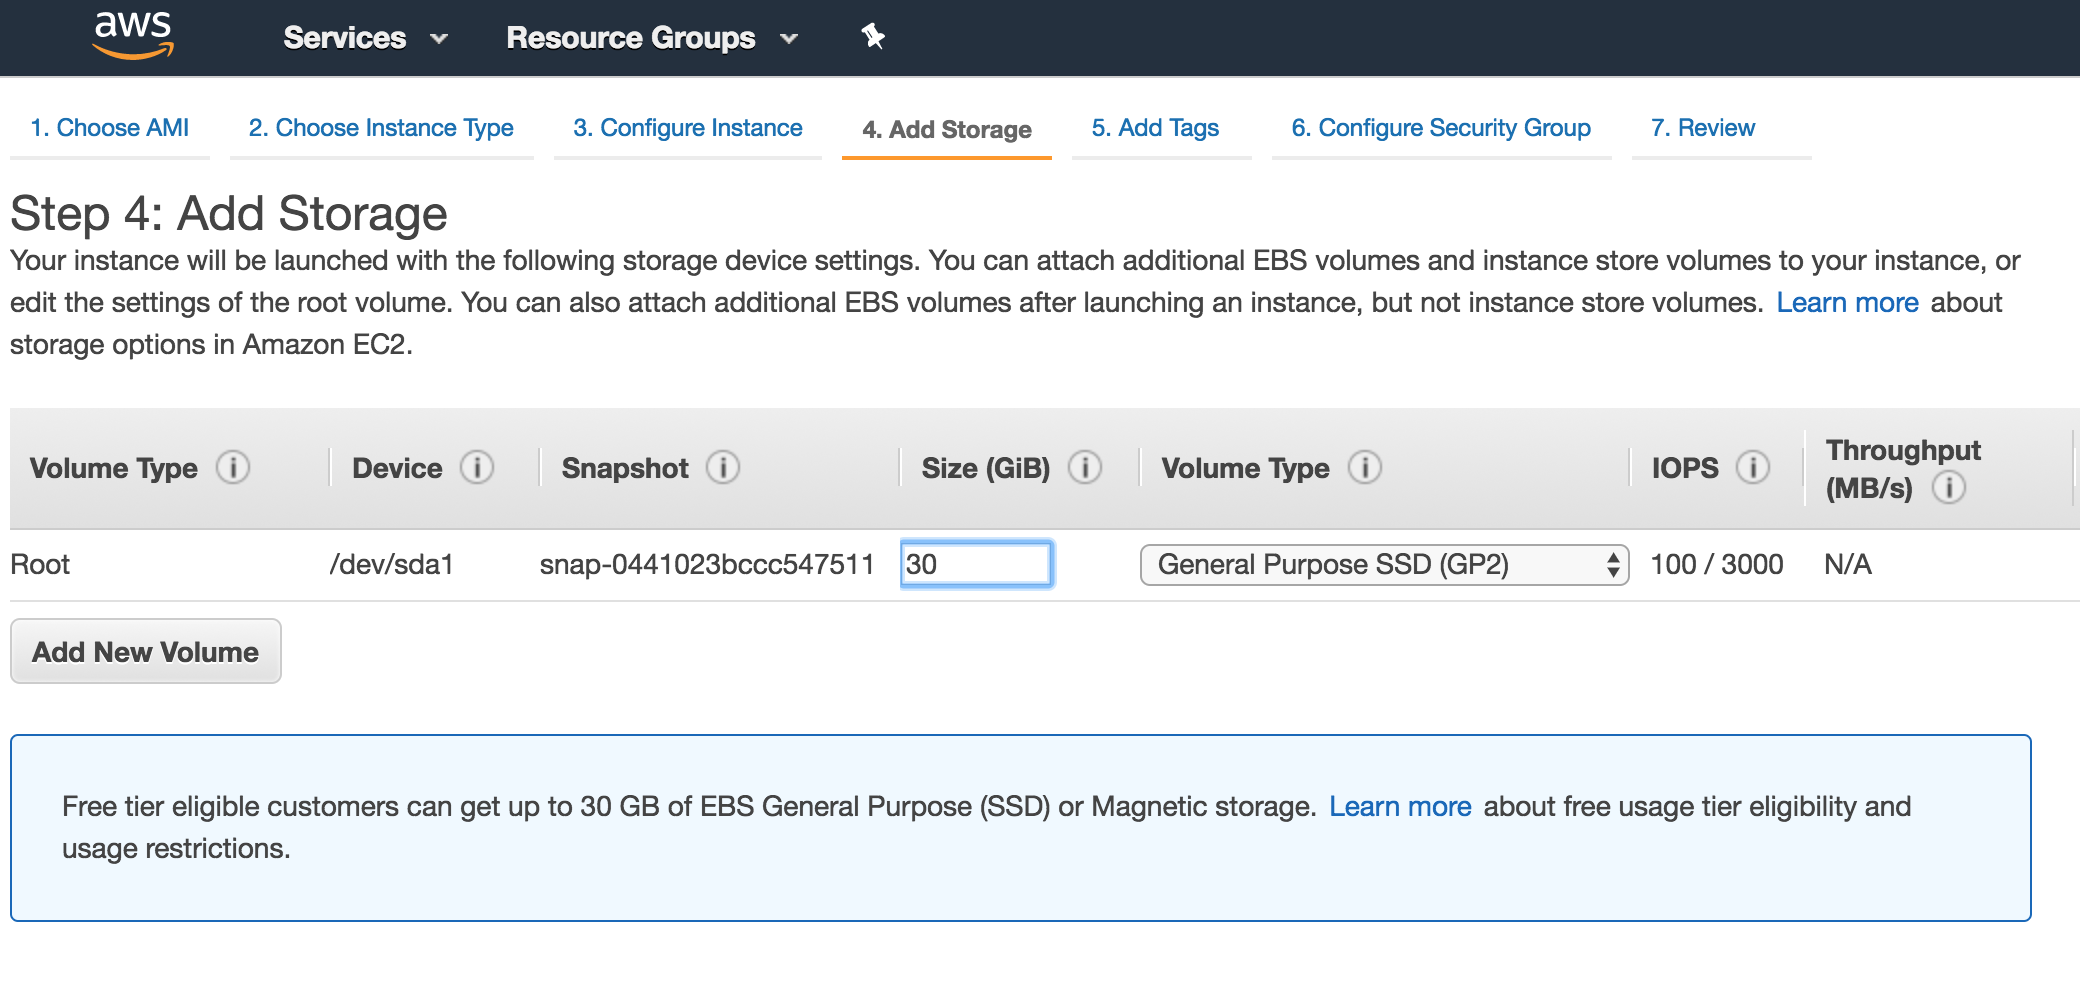
Als nächstes konfigurieren wir den Storage für die Instanz. Wir verwenden hier 30 GB, da die gerade noch in den Free-Tier fallen und so keine dauerhaften Storage-Kosten entstehen (auch wenn die Instanz gestoppt ist).
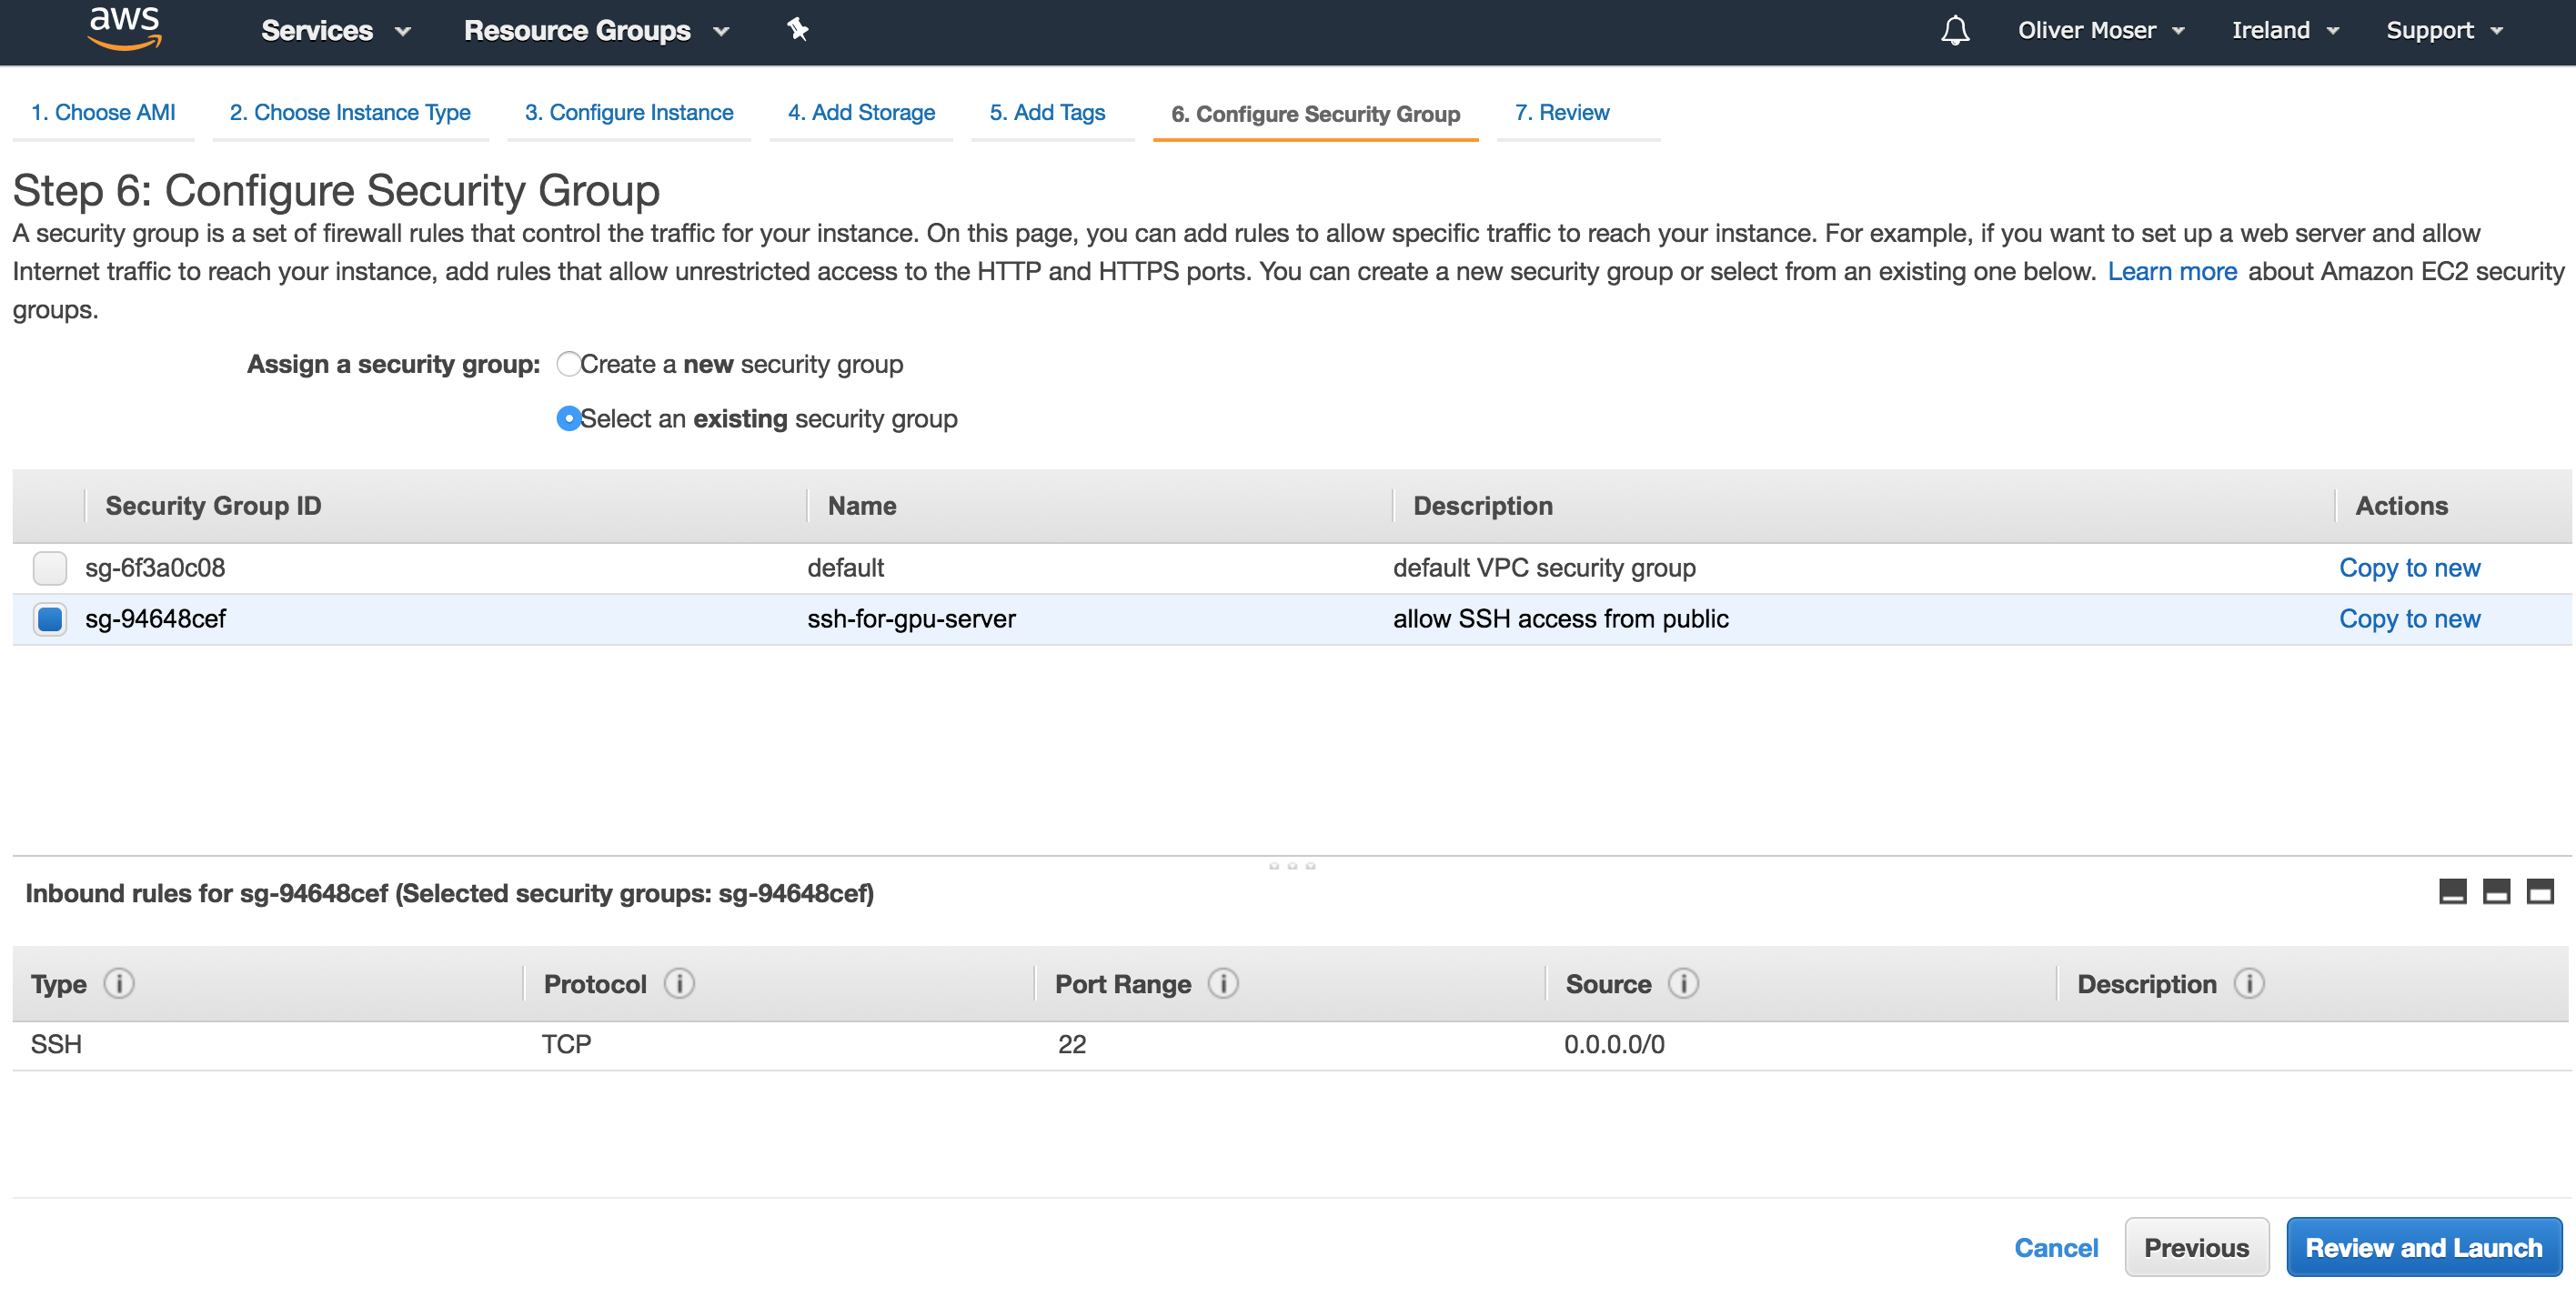
Schließlich konfigurieren wir noch eine Security Rule und erlauben, dass man sich per SSH auf der Maschine anmelden darf. Andere Ports schalten wir nicht frei - sondern verwenden später SSH Tunnel, um sie lokal erreichbar zu machen.
Jetzt starten wir die Maschine und warten ab, bis wir die Pubilic IP auslesen können. Dies machen wir später per boto3 script und automatisieren diese Schritte.
Auf Server anmelden und auf neuesten Stand bringen
# lege deine Keypair PEM Datei in deinem SSH ordner ab und setze Dateirechte auf nur lesen
cp ~/Downloads/gpuserver.pem ~/.ssh/
chmod 400 ~/.ssh/gpuserver.pem

# speichere deine Public IP in einer Umgebungs-Variable
PUBLIC_IP = "YOUR_IP_HERE"

# füge deinen SSH Key dem SSH-Agent hinzu

ssh-agent
ssh-add ~/.ssh/gpuserver.pem

# jetzt auf dem Server anmelden
ssh ubuntu@$PUBLIC_IP

# system updaten und rebooten
sudo -i
apt update
apt dist-upgrade
reboot
Nach dem Reboot, wieder auf dem System anmelden und …
Installiere Dependencies
Für OpenCV, Tensorflow usw. benötigen wir einige Dependencies, um diese später installieren/compilieren zu können.
sudo -i
apt install -y gcc g++ gfortran build-essential \
    git wget linux-image-generic libopenblas-dev \
    liblapack-dev libblas-dev cmake unzip \
    pkg-config libopenblas-dev linux-source linux-headers-generic \
    python3 python3-pip libffi-dev libssl-dev tmux emacs24-nox liblapacke-dev checkinstall \
    virtualenvwrapper libtbb2 libtbb-dev libjpeg-dev libpng-dev libtiff-dev \
    libjasper-dev libdc1394-22-dev libavcodec-dev libavformat-dev libswscale-dev libv4l-dev \
    libxvidcore-dev libx264-dev libgtk-3-dev libatlas-base-dev gfortran \
    python3.5-dev libcupti-dev gstreamer1.0 ffmpeg libhdf5-serial-dev
Installiere CUDA
Um mit der NVIDIA GPU arbeiten zu können, müssen wir CUDA installieren. Dieses kannst du auf der NVIDIA Webseite runter laden. Für cuDNN musst du einen NVIDIA Developer Account anlegen (kostet nichts) und die Lizenzbedingungen akzeptieren … Wir verwenden CUDA 8.0 und cuDNN 6.0 - bei neueren Versionen kann es sein, dass später die Builds nicht funktionieren.
Ob die GPU im Rechner angesprochen werden kann, kann man grundsätzlich wie folgt testen:
lspci | grep -i nvidia
00:1e.0 3D controller: NVIDIA Corporation GK210GL [Tesla K80] (rev a1)
Die Anleitung zur CUDA Installation liegt hier: http://docs.nvidia.com/cuda/cuda-installation-guide-linux/#axzz4WNL7OgLr
CUDA Installation anstossen:
Do you accept the previously read EULA?
accept/decline/quit: accept

Install NVIDIA Accelerated Graphics Driver for Linux-x86_64 384.81?
(y)es/(n)o/(q)uit: y

Do you want to install the OpenGL libraries?
(y)es/(n)o/(q)uit [ default is yes ]:

Do you want to run nvidia-xconfig?
This will update the system X configuration file so that the NVIDIA X driver
is used. The pre-existing X configuration file will be backed up.
This option should not be used on systems that require a custom
X configuration, such as systems with multiple GPU vendors.
(y)es/(n)o/(q)uit [ default is no ]:

Install the CUDA 8.0 Toolkit?
(y)es/(n)o/(q)uit: y

Enter Toolkit Location
 [ default is /usr/local/cuda-8.0 ]:

Do you want to install a symbolic link at /usr/local/cuda?
(y)es/(n)o/(q)uit: y

Install the CUDA 8.0 Samples?
(y)es/(n)o/(q)uit: y

Enter CUDA Samples Location
 [ default is /home/ubuntu ]:
Test:
root@ip-172-31-1-253:~# nvidia-smi
Thu Oct 19 11:34:32 2017
+-----------------------------------------------------------------------------+
| NVIDIA-SMI 384.81                 Driver Version: 384.81                    |
|-------------------------------+----------------------+----------------------+
| GPU  Name        Persistence-M| Bus-Id        Disp.A | Volatile Uncorr. ECC |
| Fan  Temp  Perf  Pwr:Usage/Cap|         Memory-Usage | GPU-Util  Compute M. |
|===============================+======================+======================|
|   0  Tesla K80           Off  | 00000000:00:1E.0 Off |                    0 |
| N/A   45C    P0    74W / 149W |      0MiB / 11439MiB |     99%      Default |
+-------------------------------+----------------------+----------------------+

+-----------------------------------------------------------------------------+
| Processes:                                                       GPU Memory |
|  GPU       PID   Type   Process name                             Usage      |
|=============================================================================|
|  No running processes found                                                 |
+-----------------------------------------------------------------------------+
Jetzt noch die Pfade konfigurieren …
echo "/usr/local/cuda-8.0/lib64" >> /etc/ld.so.conf
ldconfig
echo 'PATH=$PATH:/usr/local/cuda-8.0/bin' >> /etc/profile
cuDNN installieren
Einfach das runtergeladene cuDNN entpacken und in folgende Ordner schieben:
scp Downloads/cudnn-6.0-linux-x64.tgz ubuntu@YOUR_PUB_IP:~
ssh ubuntu@YOUR_PUB_IP
tar -xvf cudnn-6.0-linux-x64.tgz

sudo cp cuda/lib64/* /usr/local/cuda/lib64
sudo cp cuda/include/* /usr/local/cuda/include/
Python und OpenCV einrichten
Zunächst richten wir “virtualenv” ein. Damit können wir Python Abhängigkeiten wie in einer Sandbox installieren.
pip3 install virtualenv virtualenvwrapper numpy h5py
mkvirtualenv -p /usr/local/bin/python3.6 computer-vision
Download OpenCV 3.3
wget -O opencv.zip https://github.com/opencv/opencv/archive/3.3.0.zip
unzip opencv.zip
wget -O opencv_contrib.zip https://github.com/opencv/opencv_contrib/archive/3.3.0.zip
unzip opencv_contrib.zip
Configure, Build, Install …
cd opencv-3.3.0
$ mkdir build
$ cd build
$ cmake -D CMAKE_BUILD_TYPE=RELEASE \
    -D CMAKE_INSTALL_PREFIX=/usr/local \
    -D WITH_CUDA=ON \
    -D ENABLE_FAST_MATH=1 \
    -D CUDA_FAST_MATH=1 \
    -D WITH_CUBLAS=1 \
    -D INSTALL_PYTHON_EXAMPLES=ON \
    -D OPENCV_EXTRA_MODULES_PATH=../../opencv_contrib-3.3.0/modules \
    -D BUILD_EXAMPLES=ON ..

make -j4
sudo make install

sudo ldconfig


# jetzt noch das global installierte .so file ins virtualenv mappen
cd ~/.virtualenvs/computer-vision/lib/python3.5/site-packages/
ln -s /usr/local/lib/python3.5/site-packages/cv2.cpython-35m-x86_64-linux-gnu.so cv2.so
Install Tensorflow
Tensorflow ist ein Machine Learning Framework von google. Wir installieren es from source und optimieren es beim Compilieren für die darunter liegende Hardware.
Grob folgen wir der Beschreibung auf: https://www.tensorflow.org/install/install_sources
sudo apt-get install libcupti-dev
sudo apt-get install openjdk-8-jdk
echo "deb [arch=amd64] http://storage.googleapis.com/bazel-apt stable jdk1.8" | sudo tee /etc/apt/sources.list.d/bazel.list
curl https://bazel.build/bazel-release.pub.gpg | sudo apt-key add -
sudo apt-get upgrade bazel
sudo apt-get install python3-numpy python3-dev python3-pip python3-wheel

git clone https://github.com/tensorflow/tensorflow.git
cd tensorflow
./configure
Dann die Fragen wie folgt beantworten. Bei der AWS p2.xlarge ist aktuell eine NVIDIA K80 “verbaut”. Diese hat die Compute Capability 3.7 … wenn ihr eine andere Instanz verwendet, müsst ihr bei NVIDIA nachlesen, welche Capabilities die Grafikkarte hat.
Extracting Bazel installation...
You have bazel 0.7.0 installed.
Please specify the location of python. [Default is /home/ubuntu/.virtualenvs/computer-vision/bin/python]:


Traceback (most recent call last):
  File "<string>", line 1, in <module>
AttributeError: module 'site' has no attribute 'getsitepackages'
Found possible Python library paths:
  /home/ubuntu/.virtualenvs/computer-vision/lib/python3.5/site-packages
Please input the desired Python library path to use.  Default is [/home/ubuntu/.virtualenvs/computer-vision/lib/python3.5/site-packages]

Do you wish to build TensorFlow with jemalloc as malloc support? [Y/n]:
jemalloc as malloc support will be enabled for TensorFlow.

Do you wish to build TensorFlow with Google Cloud Platform support? [Y/n]:
Google Cloud Platform support will be enabled for TensorFlow.

Do you wish to build TensorFlow with Hadoop File System support? [Y/n]:
Hadoop File System support will be enabled for TensorFlow.

Do you wish to build TensorFlow with Amazon S3 File System support? [Y/n]:
Amazon S3 File System support will be enabled for TensorFlow.

Do you wish to build TensorFlow with XLA JIT support? [y/N]:
No XLA JIT support will be enabled for TensorFlow.

Do you wish to build TensorFlow with GDR support? [y/N]:
No GDR support will be enabled for TensorFlow.

Do you wish to build TensorFlow with VERBS support? [y/N]:
No VERBS support will be enabled for TensorFlow.

Do you wish to build TensorFlow with OpenCL support? [y/N]:
No OpenCL support will be enabled for TensorFlow.

Do you wish to build TensorFlow with CUDA support? [y/N]: y
CUDA support will be enabled for TensorFlow.

Please specify the CUDA SDK version you want to use, e.g. 7.0. [Leave empty to default to CUDA 8.0]: 8.0


Please specify the location where CUDA 8.0 toolkit is installed. Refer to README.md for more details. [Default is /usr/local/cuda]:


Please specify the cuDNN version you want to use. [Leave empty to default to cuDNN 6.0]:


Please specify the location where cuDNN 6 library is installed. Refer to README.md for more details. [Default is /usr/local/cuda]:


Please specify a list of comma-separated Cuda compute capabilities you want to build with.
You can find the compute capability of your device at: https://developer.nvidia.com/cuda-gpus.
Please note that each additional compute capability significantly increases your build time and binary size. [Default is: 3.7]3.7


Do you want to use clang as CUDA compiler? [y/N]:
nvcc will be used as CUDA compiler.

Please specify which gcc should be used by nvcc as the host compiler. [Default is /usr/bin/gcc]:


Do you wish to build TensorFlow with MPI support? [y/N]:
No MPI support will be enabled for TensorFlow.

Please specify optimization flags to use during compilation when bazel option "--config=opt" is specified [Default is -march=native]:


Add "--config=mkl" to your bazel command to build with MKL support.
Please note that MKL on MacOS or windows is still not supported.
If you would like to use a local MKL instead of downloading, please set the environment variable "TF_MKL_ROOT" every time before build.
Configuration finished
Jetzt müssen wir schauen welche Fähigkeiten die CPU des Systems hat:
cat /proc/cpuinfo | grep --color -e sse -e fma -e avx
Aus den Flags ergibt sich folgende Build configuration:
bazel build -c opt --config=cuda --copt=-mavx --copt=-mavx2 --copt=-msse4.1 --copt=-mfma --copt=-msse4.2  -k //tensorflow/tools/pip_package:build_pip_package
bazel-bin/tensorflow/tools/pip_package/build_pip_package /tmp/tensorflow_pkg
pip install /tmp/tensorflow_pkg/tensorflow-1.4.0rc0-cp35-cp35m-linux_x86_64.whl
Test TensorFlow
Jetzt können wir kurz testen, ob die TensorFlow Installation funktioniert und ob sie die GPU verwendet …
python
Python 3.5.2 (default, Sep 14 2017, 22:51:06)
[GCC 5.4.0 20160609] on linux
Type "help", "copyright", "credits" or "license" for more information.
>>> import tensorflow as tf
>>> hello = tf.constant('Hello, TensorFlow!')
>>> sess = tf.Session()
2017-10-27 11:26:58.214289: I tensorflow/stream_executor/cuda/cuda_gpu_executor.cc:892] successful NUMA node read from SysFS had negative value (-1), but there must be at least one NUMA node, so returning NUMA node zero
2017-10-27 11:26:58.214612: I tensorflow/core/common_runtime/gpu/gpu_device.cc:1031] Found device 0 with properties:
name: Tesla K80 major: 3 minor: 7 memoryClockRate(GHz): 0.8235
pciBusID: 0000:00:1e.0
totalMemory: 11.17GiB freeMemory: 11.10GiB
2017-10-27 11:26:58.214636: I tensorflow/core/common_runtime/gpu/gpu_device.cc:1121] Creating TensorFlow device (/device:GPU:0) -> (device: 0, name: Tesla K80, pci bus id: 0000:00:1e.0, compute capability: 3.7)
>>> print(sess.run(hello))
b'Hello, TensorFlow!'
Installation von weiteren Tools
Jetzt installieren wir noch ein paar weitere nützliche Tools für Computer Vision
keras, jupyter, …
pip install scipy pillow imutils h5py requests progressbar2 scikit-learn scikit-image matplotlib keras jupyter
touch ~/.matplotlib/matplotlibrc
echo "backend: TkAgg" >> ~/.matplotlib/matplotlibrc

pip install http://download.pytorch.org/whl/cu80/torch-0.2.0.post3-cp35-cp35m-manylinux1_x86_64.whl
pip install torchvision
install boost
Braucht man für dlib
wget https://dl.bintray.com/boostorg/release/1.65.1/source/boost_1_65_1.tar.bz2
tar -xvf boost_1_65_1.tar.bz2
cd boost_1_65_1
./bootstrap.sh --with-libraries=python
export CPLUS_INCLUDE_PATH="$CPLUS_INCLUDE_PATH:/usr/include/python3.5/"
./b2
sudo ./b2 install
install dlib
dlib ist eine ziemlich gute Library für einige spezielle use cases. Man kann mit dlib z.B. gute Detektoren, trotz kleinem Trainingsset bauen (mmod algo). Ausserdem sind die Facial Landmark Modelle recht gut …
wget http://dlib.net/files/dlib-19.7.tar.bz2
tar -xvf dlib-19.7.tar.bz2
cd dlib-19.7

mkdir build
cd build
cmake ..
cmake --build . --config Release

cd ..
python setup.py install
… so das wäre es erstmal. Wenn jetzt alles funktioniert, am Besten eine Snapshot/Backup vom System machen, so dass man das nicht so bald nochmal alles durchmachen muss.