1. Getting started
There are two ways to activate Chaos Monkey for Spring Boot (CM4SB) in your existing Spring Boot app. Either by adding it to your regular app dependencies (eg. pom.xml/build.gradle(.kts)) or instead, you include it as an external dependency when starting your Spring Boot app.
1.1. Adding Chaos Monkey for Spring Boot
1.1.1. As dependency
1.) Add Chaos Monkey for Spring Boot as dependency for your project
<dependency>
    <groupId>de.codecentric</groupId>
    <artifactId>chaos-monkey-spring-boot</artifactId>
    <version>4.0.0</version>
</dependency>implementation 'de.codecentric:chaos-monkey-spring-boot:4.0.0'implementation("de.codecentric:chaos-monkey-spring-boot:4.0.0")
If you want to use the latest snapshot version, add the maven central staging repository central.sonatype.com/repository/maven-snapshots/
|
2.) Start your Spring Boot App with the chaos-monkey spring profile enabled. We also pass some properties to assault services with latency.
Command line example:
java -jar your-app.jar --spring.profiles.active=chaos-monkey --chaos.monkey.enabled=true --chaos.monkey.watcher.service=true --chaos.monkey.assaults.latencyActive=truejava -jar your-app.jar -DLOAD_CHAOS_MONKEY=true --chaos.monkey.enabled=true --chaos.monkey.watcher.service=true --chaos.monkey.assaults.latencyActive=truePassing all arguments through command line is a bit cumbersome, but you can also specify the properties in your application.properties file, head over to Minimal CM4SB configuration via property file to find out how.
1.1.2. Using external dependency jar file
If you dont want to add Chaos Monkey for Spring Boot to your dependencies (see As dependency), you can use the external jar solution as an alternative.
You can extend your existing application with the CM4SB and add it as an external dependency at startup.For this it is necessary to use the PropertiesLauncher of Spring Boot.
You can specify the necessary properties to activate the CM4SB as an external property file using the parameter --spring.config.location.
This special JAR file is also available through Maven Central:
<dependency>
    <groupId>de.codecentric</groupId>
    <artifactId>chaos-monkey-spring-boot</artifactId>
    <classifier>jar-with-dependencies</classifier>
    <version>4.0.0</version>
</dependency>implementation 'de.codecentric:chaos-monkey-spring-boot:4.0.0:jar-with-dependencies'implementation("de.codecentric:chaos-monkey-spring-boot:4.0.0:jar-with-dependencies")Start your Spring Boot application, add Chaos Monkey for Spring Boot JAR and properties.
java -cp your-app.jar
    -Dloader.path=chaos-monkey-spring-boot-4.0.0-jar-with-dependencies.jar
        org.springframework.boot.loader.launch.PropertiesLauncher
    --spring.profiles.active=chaos-monkey
--spring.config.location=file:./chaos-monkey.properties| Each Chaos Monkey version is built for a specific Spring Boot version, which can be found on the release page. Chaos Monkey might break when it is added as external jar and you’re using a different Spring Boot version in your application. |
It is your decision how you want to integrate and use the CM4SB. There is no difference between the two possibilities. However, it’s easier to add it as a dependency (see As dependency), so you don’t need to adjust the starting of your application.
1.2. Minimal CM4SB configuration via property file
In this example, we want to make latency attacks on our @Service annotated classes.
spring.profiles.active=chaos-monkey
chaos.monkey.enabled=true

chaos.monkey.watcher.service=true
chaos.monkey.assaults.latencyActive=truespring:
profiles:
active: chaos-monkey
chaos:
monkey:
enabled: true
watcher:
service: true
assaults:
latencyActive: trueConfiguration via property file offers all available options, but requires a restart to apply changes. To avoid this, you can configure it via Actuator.
2. Spring Boot Actuator Endpoints
Chaos Monkey for Spring Boot offers you some built in endpoints exposed via JMX or HTTP. This allows you to change configuration at runtime.
Spring Boot Actuator needs to be included in your project dependencies if you want to use this feature.
2.1. Enable chaosmonkey endpoint
management.endpoint.chaosmonkey.access=unrestricted
management.endpoint.chaosmonkeyjmx.access=unrestricted

# include all endpoints
management.endpoints.web.exposure.include=*

# include specific endpoints
management.endpoints.web.exposure.include=health,info,chaosmonkeymanagement:
endpoint:
chaosmonkey:
enabled: true
chaosmonkeyjmx:
enabled: true
endpoints:
web:
exposure:
# include all endpoints
include: "*"
# include specific endpoints
include:
- health
- info
- chaosmonkey2.2. HTTP Endpoint
| ID | Description | Methods |
|---|---|---|
Running Chaos Monkey configuration |
GET |
|
Is Chaos Monkey enabled or disabled? |
GET |
|
Enable Chaos Monkey |
POST |
|
Disable Chaos Monkey |
POST |
|
Running Watchers configuration. |
GET |
|
Change Watchers Configuration |
POST |
|
Running Assaults configuration |
GET |
|
Change Assaults configuration |
POST |
|
Execute configured runtime Assault |
POST |
2.2.1. Examples
GET Chaos Monkey Configuration
{
  "chaosMonkeyProperties": {
    "enabled": true,
    "togglePrefix": "chaos.monkey"
  },
  "assaultProperties": {
    "level": 3,
    "latencyRangeStart": 1000,
    "latencyRangeEnd": 3000,
    "latencyActive": true,
    "exceptionsActive": false,
    "exception": {
      "type": "java.lang.RuntimeException",
      "method": "<init>",
      "arguments": [
        {
          "className": "java.lang.String",
          "value": "Chaos Monkey - RuntimeException"
        }
      ]
    },
    "killApplicationActive": false,
    "memoryActive": false,
    "memoryMillisecondsHoldFilledMemory": 90000,
    "memoryMillisecondsWaitNextIncrease": 1000,
    "memoryFillIncrementFraction": 0.15,
    "memoryFillTargetFraction": 0.25,
    "cpuActive": true,
    "cpuMillisecondsHoldLoad": 90000,
    "cpuLoadTargetFraction": 0.9,
  },
  "watcherProperties": {
    "controller": false,
    "restController": true,
    "service": false,
    "repository": false,
    "component": false,
    "restTemplate": false,
    "webClient": false,
    "actuatorHealth": false
  }
}
GET Chaos Monkey Status
Case: Chaos Monkey is running.
{
  "enabledAt": "2022-03-18T10:01:54.465+01:00",
  "enabledFor": {
    "raw": "PT45.221S",
    "formatted": "45 seconds"
  },
  "enabled": true
}
Case: Chaos Monkey is activated, but will not launch any attacks.
{
  "enabled": false
}
POST Chaos Monkey enable
{
  "enabledAt": "2022-03-18T10:06:22.094+01:00",
  "enabled": true
}
POST Chaos Monkey disable
{
  "disabledAt": "2022-03-18T10:06:57.185+01:00",
  "enabledFor": {
    "raw": "PT35.091S",
    "formatted": "35 seconds"
  },
  "enabled": false
}
GET Watchers
{
  "controller": false,
  "restController": true,
  "service": false,
  "repository": false,
  "component": false,
  "restTemplate": false,
  "webClient": false,
  "actuatorHealth": false
}
POST Watchers
Request to enable/disable Watchers
{
  "controller": true,
  "restController": true,
  "service": true,
  "repository": true,
  "component": false,
  "restTemplate": false,
  "webClient": false,
  "actuatorHealth": false
}Watcher config has changedGET Assaults
{
  "level": 3,
  "latencyRangeStart": 1000,
  "latencyRangeEnd": 3000,
  "latencyActive": true,
  "exceptionsActive": false,
  "exception": {
      "type": "java.lang.RuntimeException",
      "method": "<init>",
      "arguments": [
        {
          "className": "java.lang.String",
          "value": "Chaos Monkey - RuntimeException"
        }
      ]
    },
  "killApplicationActive": false,
  "killApplicationCronExpression": "OFF",
  "memoryActive": false,
  "memoryMillisecondsHoldFilledMemory": 90000,
  "memoryMillisecondsWaitNextIncrease": 1000,
  "memoryFillIncrementFraction": 0.15,
  "memoryFillTargetFraction": 0.25,
  "memoryCronExpression": "OFF",
  "cpuActive": true,
  "cpuMillisecondsHoldLoad": 90000,
  "cpuLoadTargetFraction": 0.9,
  "cpuCronExpression": "OFF"
}
POST Assaults
Request to enable Latency & Exception Assault
{
  "level": 5,
  "latencyRangeStart": 2000,
  "latencyRangeEnd": 5000,
  "latencyActive": true,
  "exceptionsActive": true,
  "killApplicationActive": false
}Assault config has changedDefine specific method attacks
{
  "level": 5,
  "latencyRangeStart": 2000,
  "latencyRangeEnd": 5000,
  "latencyActive": true,
  "exceptionsActive": true,
  "killApplicationActive": false,
  "watchedCustomServices": [
    "com.example.chaos.monkey.chaosdemo.controller.HelloController.sayHello",
    "com.example.chaos.monkey.chaosdemo.controller.HelloController.sayGoodbye"
  ]
}Assault config has changedDefine custom Exceptions
{
  "level": 5,
  "latencyRangeStart": 2000,
  "latencyRangeEnd": 5000,
  "latencyActive": true,
  "exceptionsActive": true,
  "killApplicationActive": false,
  "exception": {
    "type": "java.lang.IllegalArgumentException",
    "method": "<init>",
    "arguments": [
      {
        "className": "java.lang.String",
        "value": "custom illegal argument exception"
      }
    ]
  }
}Assault config has changed2.2.2. POST Assault Attack
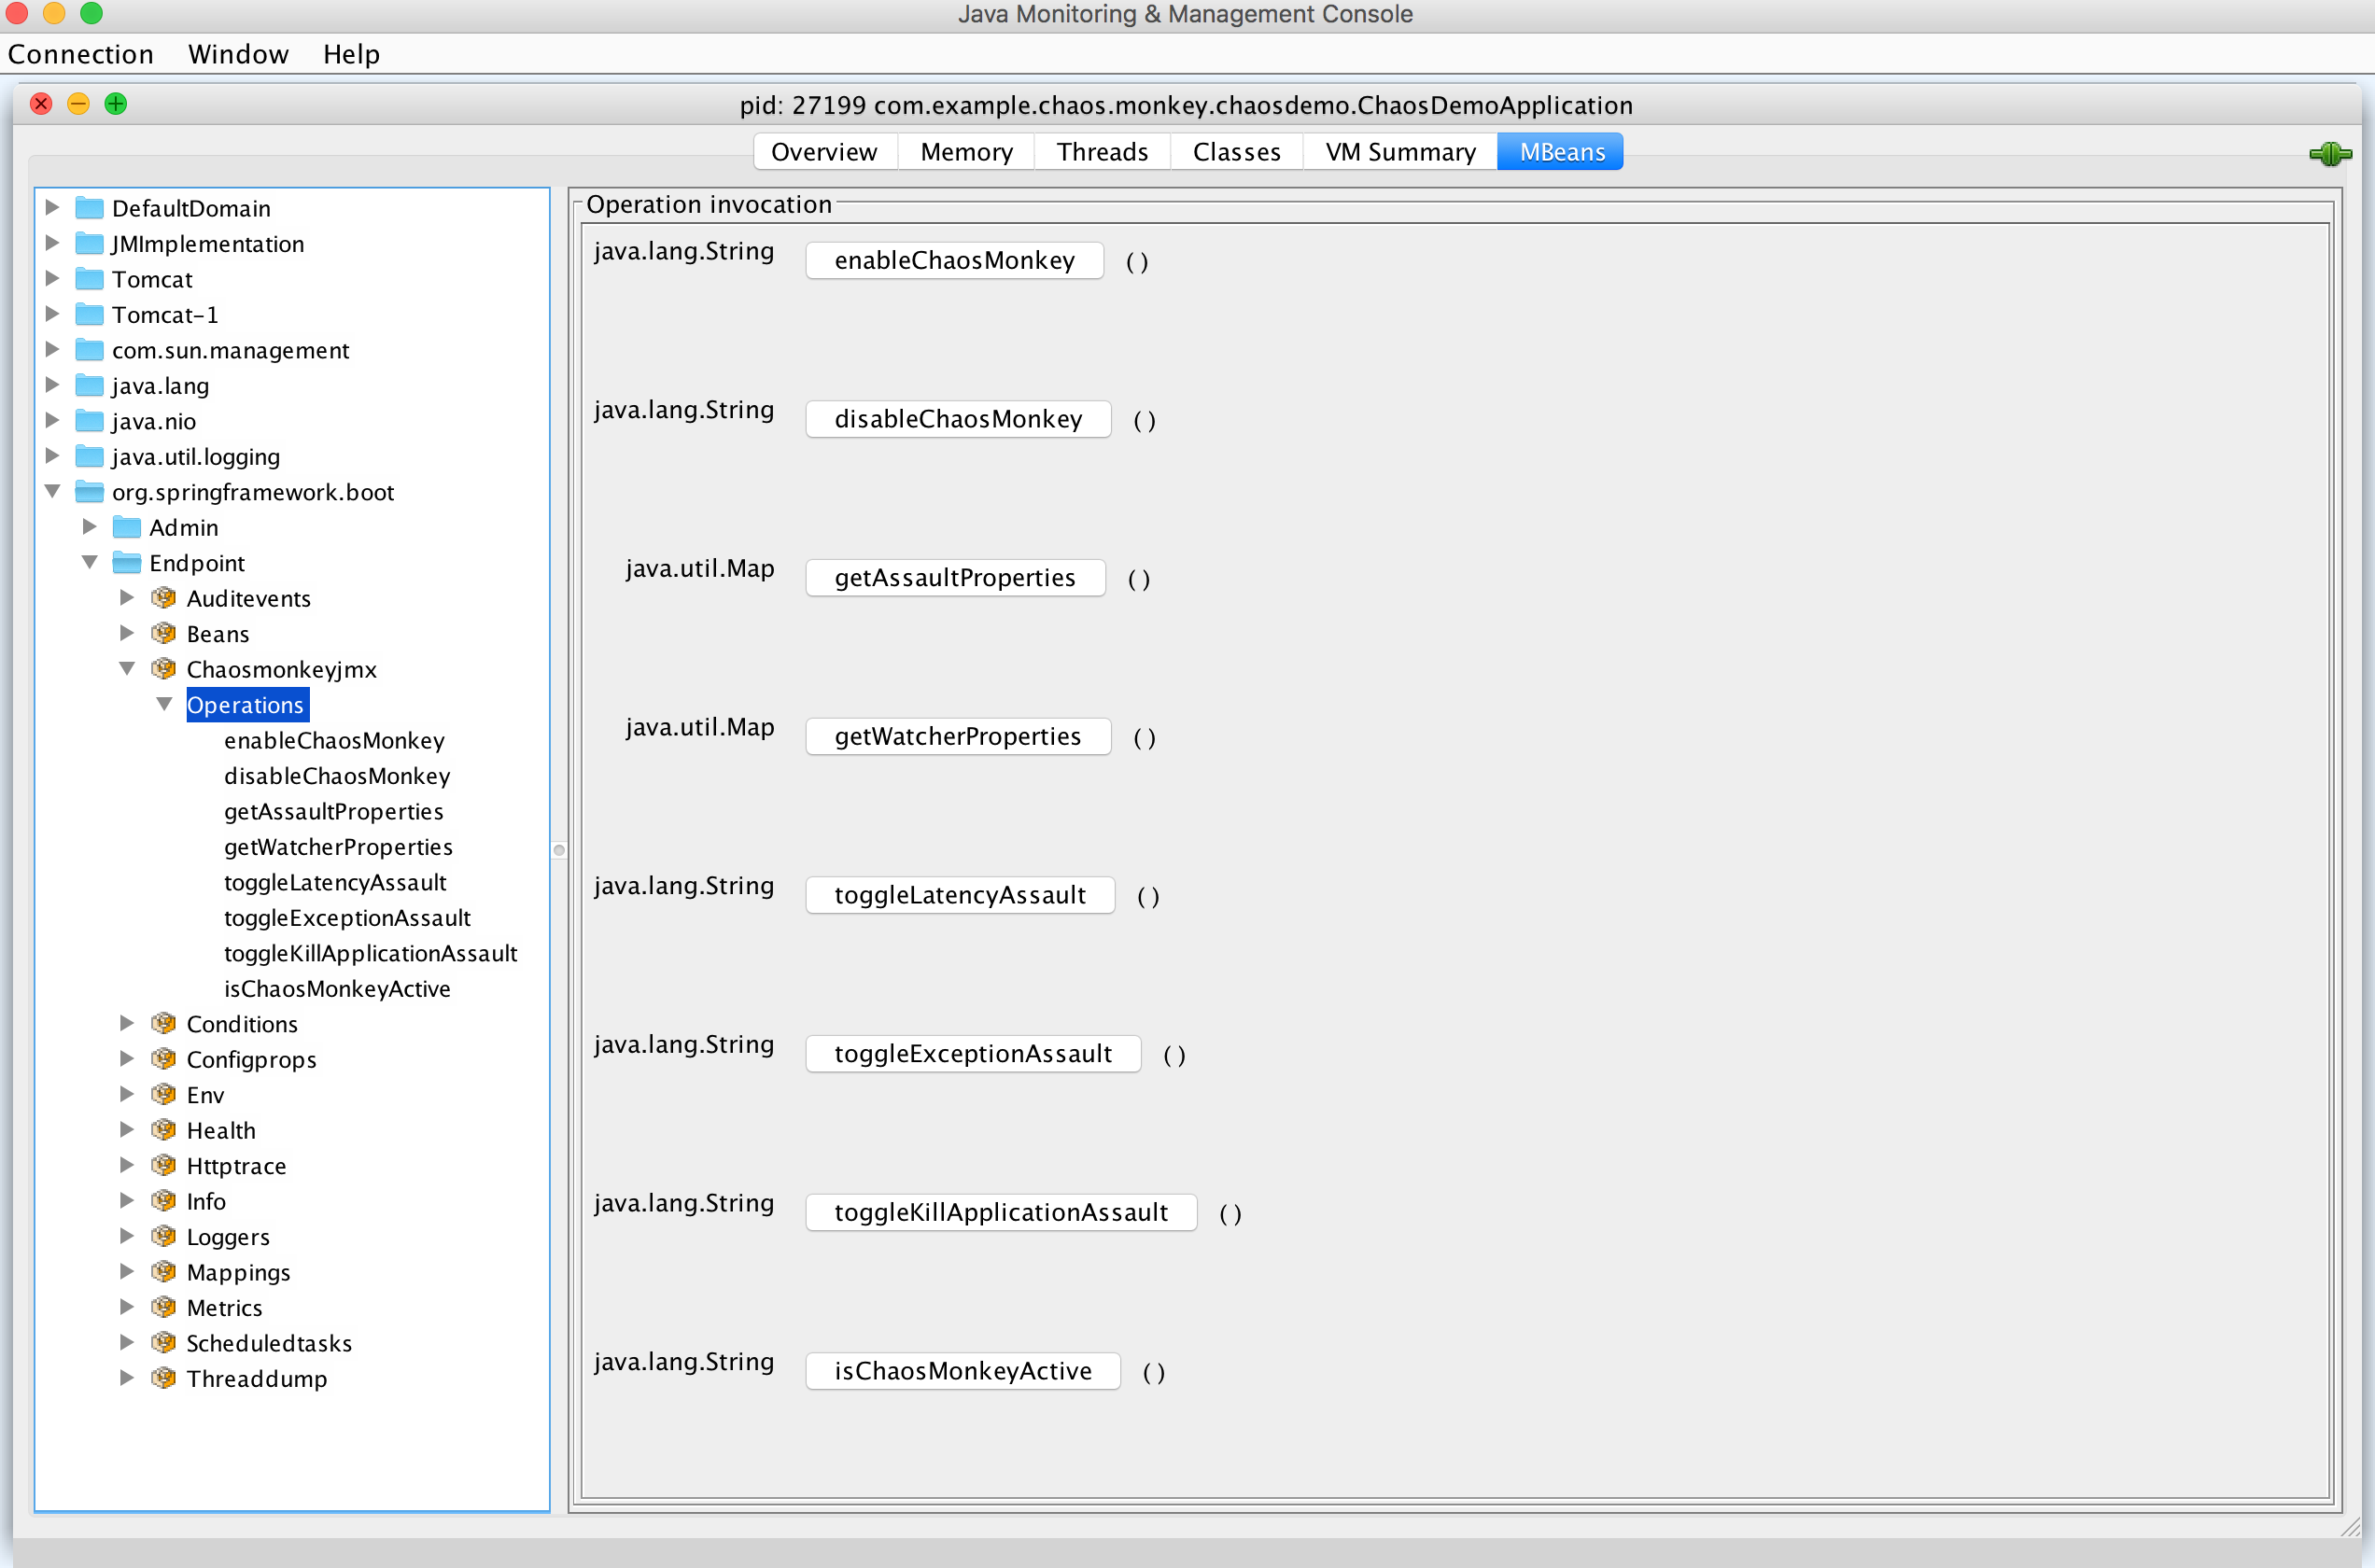
Started runtime assaults2.3. JMX Endpoint
Some settings can also be made via JMX, but detailed changes to the assaults are not possible.
| Operation | Description | Response example |
|---|---|---|
enableChaosMonkey |
Enable Chaos Monkey |
enabledAt=2022-03-18T10:19:51.108+01:00 enabled=true |
disableChaosMonkey |
Disable Chaos Monkey |
enabled=false |
getAssaultProperties |
Running Assault configuration |
level=3 latencyRangeStart=1000 latencyRangeEnd=3000 latencyActive=true exceptionsActive=false killApplicationActive=false restartApplicationActive=false |
getWatcherProperties |
Running Watcher configuration |
controller=true restController=false service=true repository=false component=false |
toggleLatencyAssault |
Toggle Latency Assault status |
New value (true/false) |
toggleExceptionAssault |
Toggle Exception Assault status |
New value (true/false) |
toggleKillApplicationAssault |
Toggle KillApplication Assault status |
New value (true/false) |
toggleMemoryAssault |
Toggle Memory Assault status |
New value (true/false) |
toggleCpuAssault |
Toggle CPU Assault status |
New value (true/false) |
isChaosMonkeyActive |
Is Chaos Monkey active or not |
true or false |
2.4. Enable springdoc-openapi integration
Enable wanted endpoints like described in Enable chaosmonkey endpoint. Then include springdoc-openapi in your dependencies and configure the following:
springdoc.show-actuator=true
chaos.monkey.apidoc.enabled=truespringdoc:
show-actuator: true
chaos.monkey:
apidoc:
enabled: trueChaosmonkey will now show up as a group in your Swagger UI.
3. Chaos Toggles and Name Mapping
Chaos Monkey for Spring Boot supports toggles, also known as feature flags. Feature flags are evaluated on every request, allowing the ability to conditionally enable an assault.
Toggles provide:
-
An additional mechanism to enable or disable assaults
-
Allow the ability to limit chaos assaults to a specific user or role
-
Provides an extension mechanism for users to implement their own logic
3.1. Implementation
3.1.1. Defaults
By default, all toggles are enabled and respect the Chaos Monkey properties used for configuration.
| Toggles only control if an already configured assault will be used. The assault must be configured via the typical properties or actuator before a toggle will be evaluated. |
3.1.2. Using Unleash to control toggles
Unleash is an open source service and SDK that can be used to configure toggles.
Chaos Monkey includes a minimal configuration for Unleash. To leverage it:
-
Include the Unleash Java SDK on your classpath
-
Configure the Unleash SDK as needed
-
Enable the property
chaos.monkey.toggle.unleash.enabled=true
| When using Unleash all toggles are DISABLED by default. So if the Chaos Monkey properties are enabled, but they don’t seem to be functioning, check your Unleash toggles. |
The default ChaosToggleNameMapper is in place and will check for toggles named the following (based on the target of an assault):
chaos.monkey.controller
chaos.monkey.component
chaos.monkey.repository
chaos.monkey.restController
chaos.monkey.service
chaos.monkey.unknown
If the assault has been enabled via properties then enabling that toggle in Unleash with the matching name will allow the corresponding assault to happen.
3.2. Creating your own
3.2.1. ChaosToggleNameMapper
To control the names of the toggles, you can provide a bean that implements the ChaosToggleNameMapper interface.
public interface ChaosToggleNameMapper {
  String mapName(ChaosTarget type, String name);
}
The supplied name to the interface is the class name and method being assaulted.
public class MyVeryDetailedToggleNameMapper extends DefaultChaosToggleNameMapper {
  public MyAppToggleMapper(String prefix) {
    super(prefix);
  }

  @Override
  public String mapName(ChaosTarget type, String name) {
    return togglePrefix + "." + type.getName() + "." + name;
  }
}class MyVeryDetailedToggleNameMapper(prefix: String) : DefaultChaosToggleNameMapper(prefix) {
override fun mapName(type: ChaosTarget, name: String): String {
return togglePrefix + "." + type.getName() + "." + name
}
}This would create an extremely detailed toggle name so that individual methods and classes could be toggled individually:
chaos.monkey.controller.com.example.chaos.monkey.toggledemo.controller.HelloController.sayHello
3.2.2. ChaosToggles Interface
The ChaosToggles interface is where the actual check to enable or disable an assault is.
public interface ChaosToggles {
  boolean isEnabled(String toggleName);
}
To add you own logic to control which toggles are enabled, you can provide a bean that implements the ChaosToggles interface.
public class MyParamChaosToggles implements ChaosToggles {
  @Override
  public boolean isEnabled(String toggleName) {
    HttpServletRequest curRequest =
                    ((ServletRequestAttributes) RequestContextHolder.currentRequestAttributes()).getRequest();

    String chaosParam =  curRequest.getParameter("chaos");
    return chaosParam != null && toggleName.startsWith(chaosParam);
  }
}class MyParamChaosToggles : ChaosToggles {
override fun isEnabled(toggleName: String): Boolean {
val curRequest = (RequestContextHolder.currentRequestAttributes() as ServletRequestAttributes).request
val chaosParam = curRequest.getParameter("chaos")
return chaosParam != null && toggleName.startsWith(chaosParam)
}
}This implementation would enable chaos attacks for requests that include a chaos request parameter that starts with the toggle name.
curl http://localhost:8080/hello?chaos=chaos.monkey.repository3.3. Toggle Recommendations
By leveraging toggles it is possible to leave Chaos Monkey enabled in all environments, and conditionally trigger assaults based on feature flags or custom logic.
Make sure that any logic in custom ChaosToggles implementations are quick, since they can potentially be called multiple times per request.
4. Configuration
Chaos Monkey for Spring Boot can be customized to your planned experiment. You can decide which attacks you want to run and which parts of your application should be attacked.
4.1. Properties
| Property | Description | Values | Default |
|---|---|---|---|
chaos.monkey.enabled |
Determine whether should execute or not |
TRUE or FALSE |
FALSE |
| Property | Description | Values | Default |
|---|---|---|---|
chaos.monkey.assaults.level |
How many requests are to be attacked. 1 each request, 5 each 5th request is attacked |
1-10000 |
1 |
chaos.monkey.assaults.deterministic |
Whether the level should be used as a deterministic value (attack every x requests) or a chance (on average, 1 in x requests will be attacked) |
TRUE or FALSE |
FALSE |
chaos.monkey.assaults.latencyRangeStart |
Minimum latency in ms added to the request |
Integer.MIN_VALUE, Integer.MAX_VALUE |
1000 |
chaos.monkey.assaults.latencyRangeEnd |
Maximum latency in ms added to the request |
Integer.MIN_VALUE, Integer.MAX_VALUE |
3000 |
chaos.monkey.assaults.latencyActive |
Latency assault active |
TRUE or FALSE |
FALSE |
chaos.monkey.assaults.exceptionsActive |
Exception assault active |
TRUE or FALSE |
FALSE |
chaos.monkey.assaults.exception.type |
Exception to be thrown |
Class name |
java.lang.RuntimeException |
chaos.monkey.assaults.exception.method |
Exception constructor or static creator method |
<init> for constructor or method name |
<init> |
chaos.monkey.assaults.exception.arguments[0].type |
Exception argument types (repeatable) |
Class name |
java.lang.String |
chaos.monkey.assaults.exception.arguments[0].value |
Exception argument types (repeatable) |
primitive or json value matching the respective type |
"Chaos Monkey - RuntimeException" |
chaos.monkey.assaults.killApplicationActive |
AppKiller assault active |
TRUE or FALSE |
FALSE |
chaos.monkey.assaults.killApplication.cron.expression |
Cron expression like |
Any valid cron expression (or OFF) |
OFF |
chaos.monkey.assaults.memoryActive |
Memory assault active |
TRUE or FALSE |
FALSE |
chaos.monkey.assaults.memoryMillisecondsHoldFilledMemory |
Duration to assault memory when requested fill amount is reached in ms. |
min=1500, max=Integer.MAX_VALUE |
90000 |
chaos.monkey.assaults.memoryMillisecondsWaitNextIncrease |
Time in ms between increases of memory usage. |
min=100, max=30000 |
1000 |
chaos.monkey.assaults.memoryFillIncrementFraction |
Fraction of one individual memory increase iteration. |
min=0.01, max=1.0 |
0.15 |
chaos.monkey.assaults.memoryFillTargetFraction |
Final fraction of used memory by assault. |
min=0.01, max=0.95 |
0.25 |
chaos.monkey.assaults.memory.cron.expression |
Cron expression like |
Any valid cron expression (or OFF) |
OFF |
chaos.monkey.assaults.cpuActive |
CPU assault active |
TRUE or FALSE |
FALSE |
chaos.monkey.assaults.cpuMillisecondsHoldLoad |
Duration to assault cpu when requested load is reached in ms. |
min=1500, max=Integer.MAX_VALUE |
90000 |
chaos.monkey.assaults.cpuLoadTargetFraction |
Final fraction of used cpu by assault. |
min=0.1, max=1.0 |
0.9 |
chaos.monkey.assaults.cpu.cron.expression |
Cron expression like |
Any valid cron expression (or OFF) |
OFF |
chaos.monkey.assaults.watchedCustomServices |
Limits watched packages/classes/methods |
List of fully qualified packages, class and/or method names |
Empty list |
| Property | Description | Values | Default |
|---|---|---|---|
chaos.monkey.watcher.controller |
Controller watcher active |
TRUE or FALSE |
FALSE |
chaos.monkey.watcher.restController |
RestController watcher active |
TRUE or FALSE |
FALSE |
chaos.monkey.watcher.service |
Service watcher active |
TRUE or FALSE |
FALSE |
chaos.monkey.watcher.repository |
Repository watcher active |
TRUE or FALSE |
FALSE |
chaos.monkey.watcher.component |
Component watcher active |
TRUE or FALSE |
FALSE |
chaos.monkey.watcher.actuatorHealth |
Spring actuator health watcher active |
TRUE or FALSE |
FALSE |
chaos.monkey.watcher.beans |
Bean watcher for given beans |
List of bean names |
Empty list |
chaos.monkey.watcher.beanClasses |
Bean watcher for given beans classes |
List of bean classes |
Empty list |
chaos.monkey.watcher.exclude |
Exclude classes from proxying. Use if proxying a class breaks it. |
List of class names |
Empty list |
5. Watcher
A watcher is a Chaos Monkey for Spring Boot component, that will scan your app for beans based on one of the conditions described in Watcher Types.
With the help of Spring AOP, Chaos Monkey recognizes the execution of a public method in a watched bean and will either not execute any action or start one of its assaults. You can customize the behaviour by configuration.
5.1. Watcher Types
5.1.1. Annotation Watchers
These watchers find your beans based on the following annotations:
-
@Controller
-
@RestController
-
@Service
-
@Repository
-
@Component
5.1.2. Actuator Watchers
Chaos Monkey can also watch the
and assault the health checks with exceptions and latency. Exceptions will let the HealthIndicators go into status DOWN and the latency assault postpone the response.
5.1.3. Outgoing Request Watchers
Chaos Monkey also provides watchers for:
-
RestTemplate
-
WebClient
The watchers will inject assaults for all RestTemplate and WebClient beans in the Spring Context based on the given assault configuration.
| RestTemplates and WebClients which are created not as a bean via new RestTemplate() and WebClient.create() are not getting instrumented. |
| These watchers don’t use AOP. Instead, they inject respective customizers. |
5.1.4. Alternative Bean Watcher
Chaos Monkey can watch any Bean in your application by name or class.
| The chaos monkey profile must be active and bean names/classes must be configured when the beans are created. Adding bean names/classes to the configuration after the beans have been created will not enable them to be watched. |
5.2. Customize Watcher
You can customize the behavior of all watchers using the property watchedCustomServices and decide which classes and public methods should be attacked. You can set the property to reference public methods, classes or packages.
If watchedCustomServices is not set, all classes and public methods recognized by the enabled watchers are attacked.
You can either maintain the list in your application properties or adjust it at runtime using the Spring Boot Actuator Endpoint.
See following examples:
{
  "level": 3,
  "latencyActive": true,
  "latencyRangeStart": 1000,
  "latencyRangeEnd": 3000,
  "watchedCustomServices": [
    "com.example.chaos.monkey.chaosdemo.controller.HelloController.sayHello",
    "com.example.chaos.monkey.chaosdemo.service.HelloService"
  ]
}chaos.monkey.enabled=true
chaos.monkey.watcher.controller=true
chaos.monkey.assaults.level=1
chaos.monkey.assaults.latency-active=true
chaos.monkey.assaults.watchedCustomServices=com.example.chaos.monkey.chaosdemo.controller.HelloController.sayHello,com.example.chaos.monkey.chaosdemo.service.HelloServicechaos:
monkey:
enabled: true
watcher:
controller: true
assaults:
level: 1
latency-active: true
watched-custom-services:
- com.example.chaos.monkey.chaosdemo.controller.HelloController.sayHello
- com.example.chaos.monkey.chaosdemo.service.HelloService| This list only restricts the attacked classes found by watchers. If a class or method wasn’t attacked when this list was unset, it won’t be attacked if it is added to the list. |
6. Assaults
Assaults are the heart of Monkey’s Chaos and he makes use of them based on your configuration. The following assaults are provided:
6.1. Request Assaults
These assaults attack some point of your application and are triggered by a /chaosmonkey/watchers - Response 200 OK, for example when a method of your component is called.
6.1.1. Latency Assault
If Latency Assault is enabled, latency is added to a request. You control the number of requests where this should occur via the level.
6.1.2. Exception Assault
You can determine at runtime whether an exception should occur when the method is used.
Thanks to the great community, the Chaos Monkey for Spring Boot can throw any kind of RuntimeException. You can configure the required exception at runtime via the Actuator Endpoint.
6.2. Runtime Assaults
These assaults attack your whole application.
| You need to trigger these Assaults yourself either using Assault Scheduling or the Chaos Monkey Endpoint. |
6.2.1. AppKiller Assault
When the configured methods are called in the application, the Chaos Monkey will shut down the application.
6.2.2. Memory Assault
Memory Assaults attack the memory of the Java Virtual Machine.
| The Memory assault is heavily depending on the Java version you are using. We are testing with the default garbage collectors of each Java version. On Java 8 the fill rate is limited to 256 MB per slice! |
6.2.3. CPU Assault
CPU Assaults attack the CPU of the Java Virtual Machine.
6.3. Chaos Monkey Assault Scheduler
You can schedule Chaos Monkey Runtime Assaults (Memory, CPU, AppKiller) using cron expressions. See also Configuration
7. Metrics
Since version 2.0.1 of Chaos Monkey for Spring Boot, there are some metrics available. Thanks to micrometer, we are now able to deliver some insights about all calls and attacks recognized by the CM4SB.
Spring Boot’s application metrics facade supports numerous monitoring systems, including:
-
Atlas
-
Datadog
-
Ganglia
-
Graphite
-
Influx
-
JMX
-
New Relic
-
Prometheus
-
SignalFx
-
Simple (in-memory)
-
StatsD
-
Wavefront
7.1. CM4SB Metrics
If you have micrometer.io on your classpath and enabled, you are able to view and export these kind of insights. Take a look at Spring Docs to see how it works.
Metrics are available via Spring Boot Actuator endpoint, if you are exposing them in simple mode.
/actuator/metricsBeside all other metrics, deliverd by default, you will find some CM4SB metrics. They will always start with "chaos.monkey.*".
7.1.1. Chaos Monkey Application Metrics
Request count
-
total = all requests recognized
-
assaulted = all attacked requests
chaos_monkey_application_request_count_total
chaos_monkey_application_request_count_assaulted
7.1.2. Watcher Metrics
For all types of CM4SB Watchers, you will find a metric.
chaos_monkey_assault_component_watcher_total
chaos_monkey_assault_controller_watcher_total
chaos_monkey_assault_repository_watcher_total
chaos_monkey_assault_restController_watcher_total
chaos_monkey_assault_service_watcher_total
Assault Latency
-
*_latency_count_gauge = indicates the current average (gauge) level of all latency attacks
-
*_latency_count_total = number of latency attacks
chaos_monkey_assault_latency_count_gauge
chaos_monkey_assault_latency_count_total
Assault Exception
Number of thrown exception attacks
chaos_monkey_assault_exception_countAssault KillApp
Number of Application kills, there is a delay before the app is killed (5s) and the produce of this metric. So, be sure this metric is collected by your favorite system. Otherwise it is lost.
chaos_monkey_assault_killapp_count8. FAQ
8.1. I’m using kotlin and my classes are not attacked
If you want chaos monkey to attack your classes they need to be open (=non-final). We recommend using the Kotlin Spring plugin, which automatically opens Spring annotated classes for you:
<plugin>
    <artifactId>kotlin-maven-plugin</artifactId>
    <groupId>org.jetbrains.kotlin</groupId>
    <version>${kotlin.version}</version>

    <configuration>
        <compilerPlugins>
            <plugin>spring</plugin>
        </compilerPlugins>
    </configuration>

    <dependencies>
        <dependency>
            <groupId>org.jetbrains.kotlin</groupId>
            <artifactId>kotlin-maven-allopen</artifactId>
            <version>${kotlin.version}</version>
        </dependency>
    </dependencies>
</plugin>plugins {
id "org.jetbrains.kotlin.plugin.spring" version "<kotlin version>"
}plugins {
kotlin("plugin.spring") version "<kotlin version>"
}8.2. When I add chaos monkey I get a NullpointerException on startup
Some classes cannot be proxied correctly by spring. The most common case for this are filters extending GenericFilterBean.
To prevent these classes from being proxied, you can either:
-
mark them as final
-
don’t mark them as spring
@Component(or@Service,@Controller, …). Instead, register them as@Beaninside a configuration.
9. Changes in 4.0.0
Built with Spring Boot 4.0.2
9.2. Improvements
-
#629 Remove deprecated runtimeAssaultCronExpression configuration property
9.4. Contributors
This release was only possible because of these great humans ❤️:
Thank you for your support!